Getting started with the Vectorworks SDK, Part 2
Following on our last instalment, we’ll review the basic Vectorworks plug-in types, and then break down the architecture of our custom text note plug-in.
Regarding plug-ins in general, which you can mostly skip if you know anything at all about Vectorscript development
At application startup, Vectorworks will scan a few directories looking
for custom code, namely /Applications/Vectorworks 2011/Plug-ins and
~/Applications/Library Support/Vectorworks/2011.noindex/Plug-ins. If
it’s in the right format, it’ll automatically load it and make it
available for use in drawings. Much of the core program function is
implemented using plug-ins. Most plug-ins will have to be added to a
workspace, so that it can be accessed through the UI.
There are 4 generic types of plug-in. Think of them as nouns and verbs. Parametric objects are the nouns. Menu commands, tools, and VectorScript libraries are the verbs.
The nouns
Parametric Objects are graphical objects that exist in the 3D space of the drawing. They can control their own appearance based on user-supplied parameters and some awareness of their context, eg. the drawing scale. They can be relatively simple, like the Break Line, or horrendously complicated, like the Nemetschek-supplied Door, Window, Space and Stair objects.
Unlike VectorScript, the SDK requires you to provide a corresponding Menu or Tool to actually place the Parametric Object in a drawing. This is usually an advantage.
The Parametric Object is sub-typed by its characteristic geometry into Point, Linear, Rectangular, 2D Path and 3D Path Objects. This will mainly define how many draggable control points it has.
The black art of good parametric object design starts in wedging your particular concept into one of these subtypes, based on whether a given parameter ought to be edited graphically or numerically. Much of this guidance is going to come from industry experience. A door, for example, is better defined as a Point object with its width set from a list of valid widths, since door widths tend to come in a continuous range of sizes. A window, on the other hand, is usually built to fit, so it’s better that it be a Linear or 2D Path object that can be edited graphically. It would be nice if there were hard-and-fast rules, but then it wouldn’t be an art. So it goes.
The verbs
Menu commands and Tools are used to provide a user interface to your custom functionality. In general, the choice between them requires a judgment call based on their UI:
-
use a Menu command if you don’t require any graphical input beyond having drawing objects preselected for action;
-
use a Tool if you do need graphical input, such as an insertion point, a wall into which you want a Parametric object inserted, etc.
Examples of Menu-type plug-ins would be ones for generating reports or grouping pre-selected objects. As you should expect from the names, Menu commands will be accessed from the menu bar, and Tools will be accessed from the tool palettes. There aren’t hard-and-fast rules here either; many plug-ins could go either way. It sounds a bit dumb, but one of my rules when I’m in doubt is: if I can’t come up with a good icon, it’s probably a Menu.
VectorScript libraries are used to provide new functions within VectorScript. They aren’t expressed within the graphical UI; ie. you can’t put them in a workspace. I find it comforting to know these exist: I can use them to drop down to C++ within an existing VectorScript plug-in to gain capabilities that aren’t present in VectorScript, but without necessarily having to rewrite the entire plug-in using the SDK. But, since that’s about all I know about them, I won’t touch on them further in this tutorial.
Packaging
Plug-ins are packaged as bundles on Mac OS X, with the extension
.vwlibrary. Our finished plug-in—and with rare exceptions all modern
plug-ins—will have a directory structure like this:
rmTextNote.vwlibrary
└── Contents
      ├── Info.plist
      ├── MacOS
      │   └── rmTextNote
      └── Resources
          └── rmTextNote.qtr
This structure will be produced automatically as part of Xcode’s build process.
-
Info.plistis mostly OS X-related boilerplate, and will be generated automatically by Xcode. You shouldn’t have to edit it. -
Contents/MacOS/rmTextNoteis the binary resulting from compiling and linking your C++ source code. -
Contents/Resources/rmTextNote.qtris a resource file containing graphics, user interface strings and the like. It’s split out to make it easier to create versions of your plug-in in different languages. It’s also where you can most see Vectorworks’ lingering 1980s heritage: the file format is that of old ‘rsrc’ resource forks from Mac OS 9 and earlier. You might spelunk them with a modern resource editor, but.qtrresource files will be best created by compiling.rsource files usingRez(orRez.exeon Windows).Rezis installed as part of the OS X developer tools.
(If you see a .vwobject or .vwplugin bundle, you’re probably looking
at an old-style plug-in that contains only a Parametric without its
corresponding Menu or Tool. My preference is to put all related
Parametrics, Menus and Tools in the same .vwlibrary. As the VCOM
system takes hold, I expect you’ll start seeing only .vwlibrary
bundles).
The anatomy of our text note plug-in
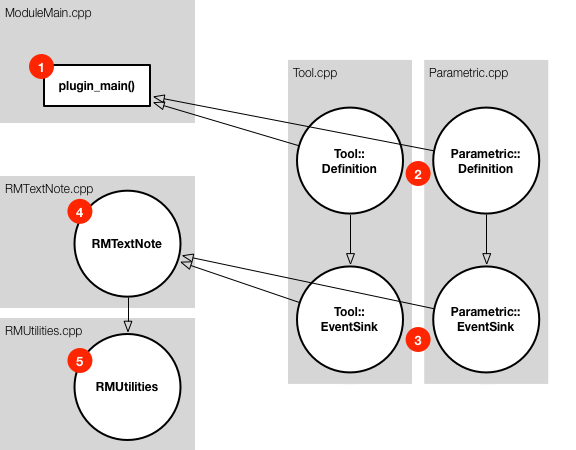
Our text note plug-in will provide both a Parametric object, and a Tool to place it. We will break it down into 6 classes and 5 files.

-
Somewhere in the plug-in object code there needs to be a
plugin_main()function defined. Vectorworks will look for this function at runtime to figure out how it should hook in your code, roughly in the same way as most Unices go hunting about forint main(int argc, char *argv[])to kick off execution of any code. This is where you tell Vectorworks whether you're building a Menu, Tool, Parametric and/or a Library plug-in. You could stick this pretty much anywhere, but we'll plant this in a file calledModuleMain.cpp. This file will be mostly boilerplate; the overall skeleton will vary little from plug-in to plug-in. -
In
plugin_main(), we will make reference to two definition classes: one for the Tool, and one for the Parametric. We'll namespace them, so that they can be referred to asTool::DefinitionandParametric::Definition. This is where we'll define the plug-in's name, type, icon, help strings, and Object Info Palette parameters. -
Plug-ins will usually sit around waiting for events to be delivered to it by Vectorworks, and invoke various actions in response to those events. Examples would be:
- the user clicks on the Tool in the palette,
- the user edits a Parametric control point or parameter in the Object Info Palette,
- the user moves or rotates a Parametric,
- &c.
Plug-ins used to have one big
switchstatement at their core, and distinguished between different events by checking an integer constant delivered to it by Vectorworks. The modern way is to define a custom subclass of one of the stock event sink classes supplied in the SDK. If you want to respond to an event, add a custom method for that event. If you don't provide a custom method, Vectorworks will use the one our event sink inherited from the superclass, which usually does nothing. This is usually referred to as the Template Method design pattern, aka. hook methods.To that end, we will be defining the classes
Tool::EventSinkandParametric::EventSinkto catch these events. These classes tend to run about 75% boilerplate. -
I like to define a separate class that models the specific behaviour
of a Parametric, and treat the event sinks mainly as dispatchers.
This keeps the logic and parameters related to how a given entity
behaves properly encapsulated, and lets us rely on the model
class—called
RMTextNotein this case—to provide consistent behaviour to either the Tool or Parametric event sink without duplicating code. The alternative is to keep logic in the event sinks. This is low-rent: it's convenient when there isn't much code, but managing the two concerns together—managing incoming events and maintaining the parametric's graphical consistency—gets cumbersome in a hurry. -
For expediency, I keep a separate
RMUtilitiesclass around. This packages up the snippets that don't yet fit elsewhere, but that I tend to use on many plug-ins. For example, I use it to abstract various office standards, like the name of the initial insertion class. I also keep a lot of the logic related to proper scaling here as class methods. As my stable of plug-ins expands, I may move some of this to an abstract superclass of either the model or the event sinks, but that seems like overkill right now.
Note that instantiating and destroying objects from most of these
classes will be handled automatically by Vectorworks. The only one whose
life cycle we’ll have to manage is the RMTextNote, which will exist on
the heap.
Plug-in parameters
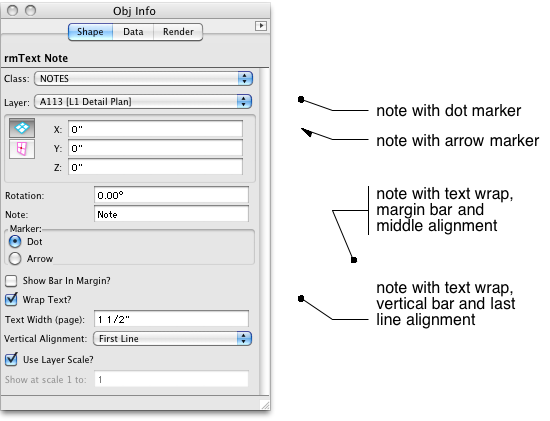
We’ll define 8 parameters for our text note. (Note that Vectorworks will automatically add Rotation to any Parametric). Some of these will be hidden or deactivated in relation to others.

-
Note is a string parameter that will hold the actual text. Vectorworks internals limit this to 255 characters, but this should be OK: we’re not writing novels here.
-
Marker is a predefined list, letting us toggle between using a dot and an arrow on the leader. Our office standard is to use a dot, unless pointing at something tiny. This one is set up as radio buttons, defaulting to Dot.
-
Show Bar In Margin? is a boolean that turns on a vertical bar to help set off the text when it gets to be several lines long.
-
Wrap Text? is a boolean that specifies if the text should wrap. Turning this on will turn on the display of the next two in the Object Info Palette.
-
Text Width (page) is a ‘dimension’ parameter, meaning it will take on the units of the current drawing. It only shows when text wrapping is turned on. It defines the width of the text block. We’ll also allow this to be set by dragging a control point in the drawing.
-
Vertical Alignment is a predefined list: one of (a) First Line, (b) Middle, (c) Last Line. It only shows when wrapping is on, and lets us tweak the wrapped text into a good spot. Usually First Line will suffice. Note that this parameter is shown as a popup menu. It could also have been radio buttons. I tend to use popups for long lists or short but seldom-adjusted lists.
-
Use Layer Scale? is a boolean that determines if the scale of the containing layer or sheet layer viewport is to be used in figuring out how big the note text and arrowhead should be, since these are measured in paper units. Turning this off will activate the next parameter.
-
Show at Scale 1 to is a real number parameter (not integer) that can be used to manually set the ratio between world and paper scale. Figuring out the correct scale is a particularly fraught issue in Vectorworks; we’ll spend a good deal of time on it. This parameter isn’t needed often, but it’s handy when the automatic scale determination isn’t doing what you want.
We’ll set the font and size to 8pt Helvetica initially, then allow it to be adjusted after placement from the Text menu like any piece of placed text. This capability is available automatically to any Parametric, provided it has been enabled, so we won’t need parameters for Font and Size.
(I also recommend adding a hidden integer Version parameter at the outset. We won’t use it in this tutorial, but it comes in handy as production plug-ins evolve).
In Part 3, we’ll get our development environment set up, and in Part 4 we’ll create a skeleton plug-in from which we’ll gradually hang working code.
